How to manage cPanel Mail Exchanger (MX) records
This article describes how to manage the Mail Exchanger (MX) records for your web site in cPanel.
About cPanel MX (Mail Exchanger) Records
cPanel manages your e-mail using its own mail server. However, you can modify Mail Exchanger (MX) DNS entries to route your web site's e-mail to other mail servers if necessary.
- If you change your MX entry settings, cPanel no longer handles your e-mail settings. Only advanced users who fully understand the effects of changing MX entries should do so.
- In addition to MX entries, you may also need to configure e-mail routing in cPanel. For more information, please see this section below.
Adding an MX record entry
To add an MX entry in cPanel, follow these steps:
- Log in to cPanel.If you do not know how to log in to your cPanel account, please see this article.
- Open the Zone Editor:
- If you are using the Jupiter theme, on the Tools page, in the Domains section, click Zone Editor:

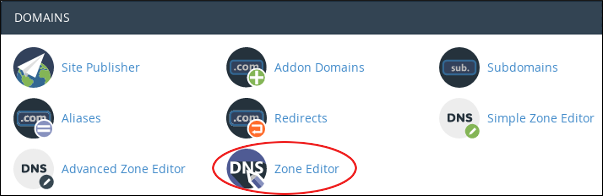
If you are using the Paper Lantern theme, in the DOMAINS section of the cPanel home page, click Zone Editor:
- If you are using the Jupiter theme, on the Tools page, in the Domains section, click Zone Editor:
Locate the domain for which you want to add an MX record, and then click MX Record:

In the Add an MX Record dialog box, in the Priority text box, type a priority.
Lower numbers represent higher priorities. Zero (0) is the highest priority.In the Destination text box, type the fully-qualified domain name (FQDN) of the mail server.
You must enter a FQDN. You cannot enter an IP address.- Click . cPanel adds the MX record.
Editing an MX record entry
To edit an MX entry in cPanel, follow these steps:
- Log in to cPanel.If you do not know how to log in to your cPanel account, please see this article.
- Open the Zone Editor:
- If you are using the Jupiter theme, on the Tools page, in the Domains section, click Zone Editor:
If you are using the Paper Lantern theme, in the DOMAINS section of the cPanel home page, click Zone Editor:
- If you are using the Jupiter theme, on the Tools page, in the Domains section, click Zone Editor:
Locate the domain you want to modify, and then click Manage:

Locate the MX record entry that you want to edit, and then click Edit.
To view only MX records in the list, next to Filter, click MX.In the Priority text box, type the priority.
Lower numbers represent higher priorities. Zero (0) is the highest priority.In the Destination text box, type the fully-qualified domain name (FQDN) of the mail server.
You must enter a FQDN. You cannot enter an IP address.- Click . cPanel modifies the MX record.
Deleting an MX record entry
To delete an MX entry in cPanel, follow these steps:
- Log in to cPanel.If you do not know how to log in to your cPanel account, please see this article.
- Open the Zone Editor:
- If you are using the Jupiter theme, on the Tools page, in the Domains section, click Zone Editor:
If you are using the Paper Lantern theme, in the DOMAINS section of the cPanel home page, click Zone Editor:
- If you are using the Jupiter theme, on the Tools page, in the Domains section, click Zone Editor:
Locate the domain you want to modify, and then click Manage:
Locate the MX record entry that you want to delete, and then click Delete.
To view only MX records in the list, next to Filter, click MX.- Click to confirm the deletion. cPanel deletes the MX record.
Configuring email routing
You should configure e-mail routing settings in cPanel if either of the following scenarios applies to your account:
- Third-party DNS: If your site uses a third party's name servers, cPanel cannot automatically detect your e-mail settings. You must manually configure e-mail routing in cPanel as described below.
- Troubleshooting: If your site uses A2 Hosting's name servers, cPanel's automatic configuration detection normally works correctly. However, if your e-mail is not working correctly, you can manually select routing settings as described below to help troubleshoot your configuration.
To configure email routing in cPanel, follow these steps:
- Log in to cPanel.If you do not know how to log in to your cPanel account, please see this article.
- Open the Email Routing tool:
- If you are using the Jupiter theme, on the Tools page, in the Email section, click Email Routing:
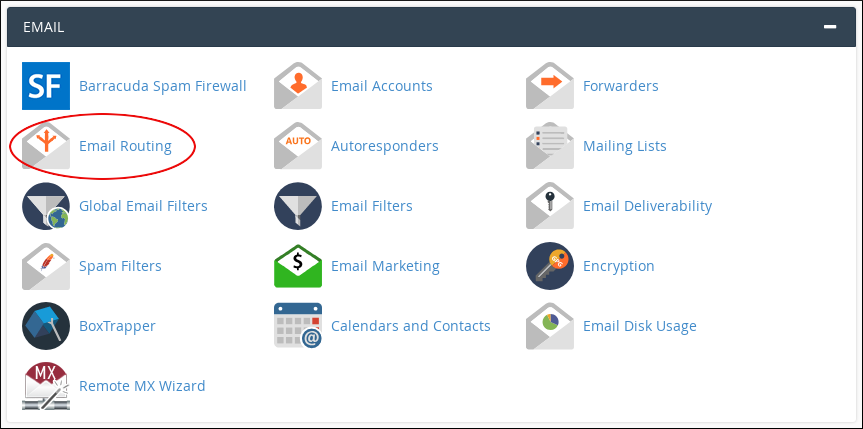
If you are using the Paper Lantern theme, in the EMAIL section of the cPanel home page, click Email Routing:
- If you are using the Jupiter theme, on the Tools page, in the Email section, click Email Routing:
- In the Domain list box, select the domain you want to configure.
Under Configure Email Routing, select the setting you want:
- Automatically Detect Configuration: This is the default and recommended setting if your site uses A2 Hosting name servers.
- Local Mail Exchanger: If your site uses A2 Hosting name servers and you are experiencing problems with e-mail, you can manually select this setting to help troubleshoot the configuration.
- Backup Mail Exchanger: This setting enables the server to function as a backup mail exchanger for your domain.
- Remote Mail Exchanger: If your site does not use A2 Hosting name servers, you must select this setting.
- Click . cPanel updates your e-mail routing settings.
More Information
For more information about MX records, please visit http://en.wikipedia.org/wiki/MX_record.
Article Details
- Product: Managed Dedicated Server Managed VPSReseller HostingShared Hosting
- Level: Advanced
Grow Your Web Business
Subscribe to receive weekly cutting edge tips, strategies, and news you need to grow your web business.
No charge. Unsubscribe anytime.
Did you find this article helpful? Then you'll love our support. Experience the A2 Hosting difference today and get a pre-secured, pre-optimized website. Check out our web hosting plans today.