Advanced domain management using the Customer Portal
This article describes how to accomplish advanced domain management tasks using the A2 Hosting Customer Portal.
Changing contact information
To change the registrant, administrative, or technical contact information for a domain, follow these steps:
- Log in to the Customer Portal.If you do not know how to log in to the Customer Portal, please see this article.
- On the menu bar, click , and then click :
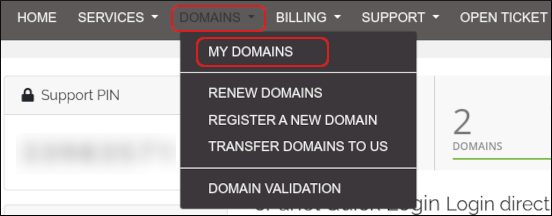
Click the domain you want to configure.
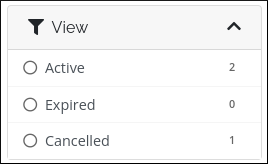
You can filter the list of domains to only display active, expired, cancelled, or expiring domains. To do this, in the View sidebar, click the type of domain status you want to view:
- In the Manage sidebar, click .
You can update the domain contact information for the following contacts. For each contact, you can select an existing account contact, or enter custom contact information in the text boxes provided:
- Registrant contact
- Administrative contact
- Technical contact
- Click .
Configuring custom name servers
For detailed information about how to configure custom name servers for a domain you purchased from A2 Hosting, please see this article.
Managing DNS records
You can use the Customer Portal to manage DNS records for your domain. You can add and modify A, MX, CNAME, SPF records and more.
- Log in to the Customer Portal.If you do not know how to log in to the Customer Portal, please see this article.
On the menu bar, click , and then click :
Click the domain you want to configure.
You can filter the list of domains to only display active, expired, cancelled, or expiring domains. To do this, in the View sidebar, click the type of domain status you want to view:
Check the nameservers. Specific nameservers are required to manage DNS in the customer portal:
- In the Manage sidebar, click .
- In the Nameserver text boxes, make sure the following nameservers are shown.
- dns1.name-services.com
- dns2.name-services.com
- dns3.name-services.com
- dns4.name-services.com
- dns5.name-services.com
- If the nameservers above are not set, click the radio button and type in the name servers shown above, then click .
- In the Manage sidebar, click .
On the DNS Management page, you can view, add, and modify DNS records for the domain:
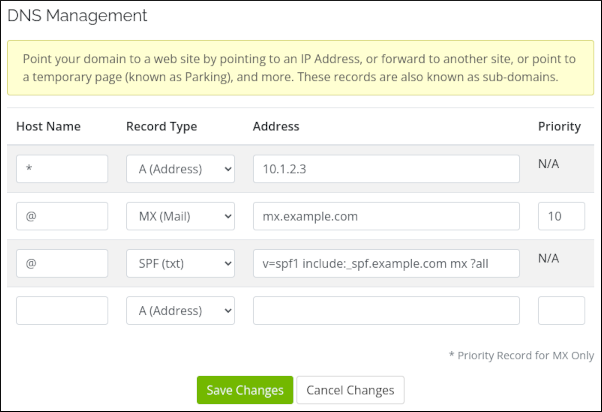
- In the Host Name text box, type the host name.
- To associate the base domain name (for example, example.com with nothing before it) with an IP address, type @ for the host name.
- To specify a wildcard DNS record, type an asterisk (*) for the host name.
- To specify a subdomain, type its name in the Host Name text box. For example, to create the test.example.com subdomain, in the Host Name text box, type test, in the Record Type list box select A (Address), and in the Address text box type the IP address.
- In the Record Type list box, select the DNS record type.
- In the Address text box, type the IP address.
- If you are setting an MX record, type the priority in the Priority text box.
- In the Host Name text box, type the host name.
- Click .
Obtaining an EPP code
If you want to transfer your domain to another registrar, you must obtain an EPP (Extensible Provisioning Protocol) code first. The EPP code is an additional security measure that helps prevent unauthorized domain transfers.
To obtain an EPP code, follow these steps:
- Log in to the Customer Portal.If you do not know how to log in to the Customer Portal, please see this article.
- On the menu bar, click , and then click :
- Click the domain for which you want to obtain an EPP code.
- In the Manage sidebar, click .
- A confirmation page appears, notifying you that the EPP code has been sent to the registrant e-mail address for the domain.
Bulk domain management
The Customer Portal allows bulk updates for:
- Nameservers.
- Auto renewal status.
- Registrar lock status.
- Contact information.
To update any of these items, follow these steps:
- Log in to the Customer Portal.If you do not know how to log in to the Customer Portal, please see this article.
- On the menu bar, click , and then click :
Select multiple domains by clicking the check box to the left of every domain you want to update:
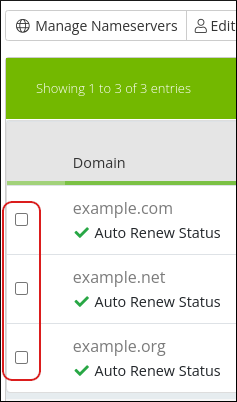
- Select the option you want to set for the selected domains. For example, to change the auto renewal status for the selected domains, click More, and then click Auto Renewal Status.
Article Details
- Product: All accounts
- Level: Intermediate
Grow Your Web Business
Subscribe to receive weekly cutting edge tips, strategies, and news you need to grow your web business.
No charge. Unsubscribe anytime.
Did you find this article helpful? Then you'll love our support. Experience the A2 Hosting difference today and get a pre-secured, pre-optimized website. Check out our web hosting plans today.